Después de varias semanas sin participar en ningún concurso de tarjeteria, hoy regreso con uno de mis favoritos, el concurso de MOJO MONDAY #191. Me fascinan éstos modelos, hacen mi imaginación volar. Quise hacer una técnica de pintura y esponjas usando las plantillas de embossing con el Big Shot y me gusto mucho el resultado. La explicación de la técnica es sencilla y la encontrarán en un paso a paso que les ofrezco más abajo para que puedan repetirla.
Espero les guste y muchas gracias por haber visitado mi blog.
*After a while from participating in any card contest, I return with one of my favorites of all time. The Challenge of Mojo Monday, this time is week #191. I love these template, they let my imagination fly free.
I wanted to use the technique using the Textured Impressions Emossing Folder with the Big Shot Machine and I loved the outcome of the card. The tutorial of the technique is too easy and you can find it in a step-by-step after the pictures I offer so you can do it.
I hope you like it, and thank you very much for visiting my blog.
Have a Great Day!!!
SUPPLIES:
Card Stock: Early Expresso, Whisoer White, Old Olive, Crumb Cake
Eyelets Metallic #105319
Textured Impression Embossing Folder Flower Garden #123113
Stampin Classic Pad River Rock
Crochet Trim Victoria 5/8" #118481
Embossing Folder Square Lattice #119976
Stamping Sponges #101610
Brayer (rodillo) #102395
Crop-a-dile #108362
Tutorial: (* English)
Necesitaras: Plantilla de repujado o embossing Flores de Jardin, un rodillo suave, un pedazo de cartulina Blanca y un Pad de tinta color River rock o Arena.
*You need: Embossing Folder Flower Garden, Brayer, Card stock Whisper White and Classic Stampin Pad River Rock.
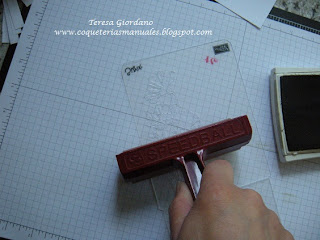
Use el rodillo y da color a todo la goma suave interna, rodando el mismo sobre la almuhadilla de tinta como se muestra en la foto de arriba.
*Use the Brayer with the Classic Pad River Rock.
Pinta la plantilla de texturizado de repujado por dentro y por el lado el cuál la silueta ésta en profundidad o undida. (no en relieve). Pasa el rodillo humedeciéndolo con tinta varias veces en el mismo lugar de la plantilla.
*Use the brayer with color on the inside of the Embossing Folder on the side where the image or silhouette is sunk.
Coloca la pieza de cartulina blanca con cuidado encima de la parte pintada de la plantilla.
* Put the Card stock White piece on the ink area.
Cierra la plantilla y usa el Big Shot para darle el repujado.
*Close the Folder and use the Big Shot machine for texture.
Mira que hermosa queda. Se le dio color al fondo pero la silueta quedo blanca.
*Looks beautiful, the silhouette is white and the background get the color.
Esta pieza de cartulina la hice por el lado contrario, osea por el lado donde las silueta esta en relieve. Aqui la imagen en relieve se pinta y el fondo dentro de la flor queda blanco.
*I did this piece on the other side of the template, put paint on the side where the figure is raised and the result is beautiful too.
Aqui tienen las dos piezas de cartulina con el embossing en ambos lados para que puedan ver la diferencia.
*Here are the two pieces of white card stock with the embossing on both sides of the template so now you can see the difference.
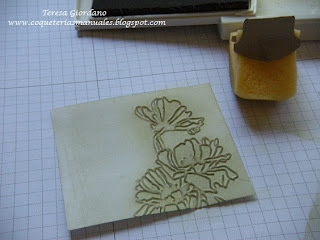
Con ayuda de una esponja y con el mismo color de tinta, humedece muy bien la esponja y pasa solamente por la silueta el relieve.
*Take a sponge and wet it thoroughly with the same color ink and paint just about figure in emboss of the flower.

Haz el paso anterior con la otra pieza de cartulina donde el repujado está undido.
*Do the previous step in the other piece of cardboard.
La dieferencia también es espectacular.... Me encantan las dos técnicas.
*The difference is amazing too ..... I love this technique.
Aquí puedes ver mejor la diferencia entre ambas piezas. Espero te haya gustado y decidas hacerla en tu próximo proyecto.
*Here you can see better the difference between the two pieces. I hope you enjoyed it and decide to do on your next project.
SEE YOU.....


sos una genia Tere!! besos Vanesa
ResponderEliminar